Filed Under:
Beginner’s guide to designing in Canva

Share This:
The ultimate tutorial for getting started and creating your first design in Canva.
If you’re a designer or content creator and you’re not yet using Canva, you should be. And this is coming from a creative brought up in Adobe Photoshop, Illustrator, and InDesign.
Don’t get me wrong – I still use Adobe tools regularly. But no design platform comes close to offering the ease, flexibility, and user-friendliness of Canva. (By the way, this post is not sponsored by Canva. We just like it that much.)
Last week, I taught Jon Briggs, owner of Food Fight Studios, the basics of getting started in Canva. If he can do it, anyone can. Check out the video below or keep scrolling for the full rundown.
Since launching almost a decade ago, Canva has become a mainstay of the freelance and creator economies. And unless technical creative requirements call for it, it’s often the go-to tool for digital entrepreneurs and creators who want to quickly and easily design stunning visuals without spending hours (or thousands of dollars) doing so. What’s more – there’s a browser version, a desktop app, and a mobile version of Canva, so you can design from anywhere.
Canva is not Photoshop
Let me be clear. Canva is not Photoshop, and it’s not meant to replace the more advanced design capabilities of professional software. Though Adobe Photoshop, Illustrator, and InDesign are the industry-leading design programs, they come with a steep learning curve. They’re also expensive – with annual subscription costs that can quickly add up.
Canva, on the other hand, is easy to use and affordable. It was designed with the everyday user in mind, so there’s no need for hours of tutorials or expensive training courses. In fact, you can be productive in Canva from your very first use.
Canva Pros & Cons
Before we dive in, let’s go over some of the pros and cons.
PROS:
- User-friendly interface
- Tons of templates for every design need
- Great for creating visuals quickly and easily
- Affordable (subscription starts at $12.95/month)
CONS:
- Limited design features compared to Photoshop, Illustrator, InDesign (for example, layers are non-existent in Canva)
- Not ideal for complex or highly technical designs
Getting started in Canva – Signup or login
First things first, you’ll want to either create an account or sign in. Even if you don’t opt for the “premium” Canva subscription, the free version can take you far. It costs nothing to sign up and you can get started right away. For this guide, we’ll use the browser version of Canva.com.
Home dashboard interface

From the Home screen of Canva, here’s what you’ll find:
Search Bar – Use this to search for projects in your own folders OR to find new inspiration and templates. Canva’s search feature is powerful – so even if you haven’t mapped the specifics of your design, a few keywords will strike up some inspiration.
Templates – While you can also access templates from the search bar, the dedicated “Templates” tab contains thousands of designs you can customize to make your own. It’s organized into different categories – like Instagram Stories, Flyers, or Business Cards – to help make the search easier.
Brand – This is the golden nugget! Within the “Brand” tab, you can set up what Canva calls a “Brand Kit” for any project. A Brand Kit is a collection of all your brand’s colors, fonts and logos in one place. This way you can easily maintain design consistency across all your projects – whether it’s a social media post, an email header or even a physical product. Plus, once you’re in a design, you can easily apply styles from your Brand Kit to the entire template, which means switching fonts and colors only takes matter of seconds.
Content Planner – This is a relatively new feature that allows you to map out all your content in one place, then easily “Create a Design” from those ideas when you’re ready for artwork. The feature also allows you to post directly to your social networks through Canva.
Recent Designs – Pick up where you left off on any design by finding it here.
Starting a Design from Scratch
Now that you’ve taken a tour of the Canva interface, it’s time to get started on your first design.
To create a design from scratch, select “Create a Design” in the top right hand corner on the home screen. You can select either a pre-determined size from the list in the dropdown or create a custom size.
Dimensions & design interface
Let’s use the “custom size” feature and create a square design of 2000×2000 pixels. Once you’ve done that, you’ll be brought into the design editor.

The editing interface is fairly straightforward – on the left hand side, you have a list of tools and on the right hand side is your design canvas.
In the top left corner, you can access the main menu, which allows you to save your designs, share them, access your Brand Kit (details on that below) and more. And in the top right corner, you can change your element alignment (like aligning everything the left) or change the transparency of the graphic element you’re working on.
Now that you know your way around, let’s get started on designing!
Choose a Background
For a solid color background, all you need to do is change the color of the background from the color icon in the top left corner. Select the color you want from the palette picker.

If you want an image, texture, or pattern background, simply click on the “Elements” option in the side panel and select to search Canva’s library for a background asset, or upload your own from the “Uploads” option. You can drag your selected image from the left side directly into your canvas and wait for it to highlight the canvas in order to fill the entire background.
Add Text
One of the most basic – but important – design elements is text. To add text to your design, select the “Text” tool from the left hand menu. You’ll then see a variety of text boxes you can add to your design.
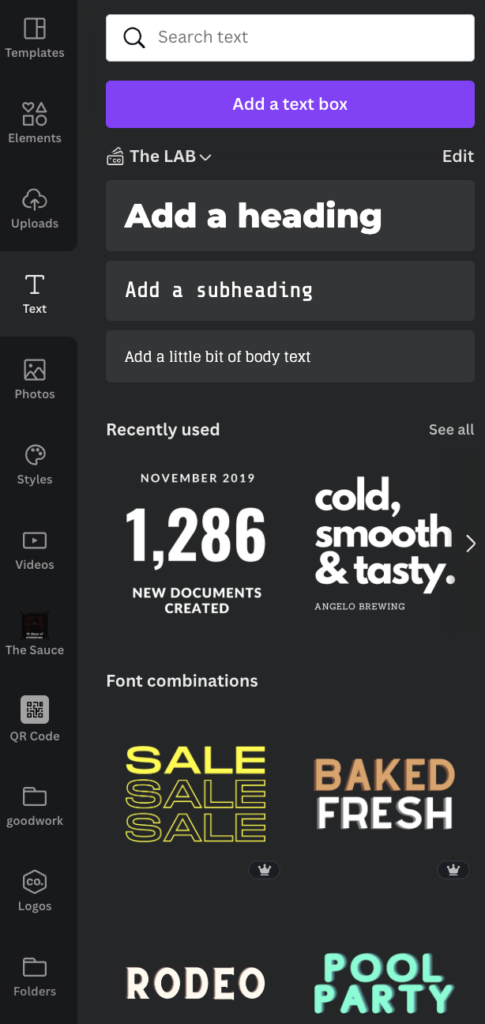
For this example, we’ll use a “Heading” text box. Click and drag it onto your canvas, then release to drop it in place.
You can now start typing in your heading. When you’re done, you can use the text editing toolbar that appears just above your canvas to change the font, size, color, alignment and more. You can also add effects like drop shadow, glow, or stroke.
To move your text box around, simply click and drag it to the desired location. To rotate it, hover your cursor just outside of the text box until you see a curved arrow, then click and drag to rotate.
You can also copy and paste text boxes by selecting the “Copy” option from the main menu, then selecting “Paste” from the dropdown. Or, if you want to duplicate the text box (including all the text and formatting), select “Duplicate” from the main menu.
Add Images & Graphic Elements
In addition to text, images (including graphic elements) are a key piece of the design puzzle. To add an image to your design, head over to the “Elements” tool on the left hand menu. You can then search by keyword and narrow the result to photos, graphics, video, audio, and more. Once you find an image you like, click on it to add it to your design.
If you want to upload your own images, select the “Uploads” tab in the search bar. You can either drag and drop images from your computer onto the canvas or click the “Upload Media” button and browse for images stored on your computer.
Once your image is in place, use the editing toolbar that appears just above the canvas to make adjustments. For photos, you can change the saturation, brightness, contrast and more. You can also add filters, crop, rotate and resize images.
Design Tip: Make the most of negative space. It’s easy to get overwhelmed with the creative possibilities in Canva, leading many to overcompensate with multiple colors, photos and fonts. With design, less is more. When in doubt, try removing some elements from your design to create negative space. This will help your design feel more balanced and can also make certain elements – like headlines – pop more.
Animate your design (optional)
Canva also supports animation! To add an animated element to your design, select the “Animate” option while your canvas is selected. This will open a library of animated elements that you can browse through and preview to either animate the entire page or specific elements. When you find one you like, simply click on it to add it to your design.
Design Tip: Canva’s “Elements” library features a broad range of motion graphics, including animated illustrations, videos, and GIFs. Think of these like “stickers” you see on Instagram, Facebook, and more. For digital designs like Instagram Stories or GIFs, motion elements are a fun way to add some personality while capturing attention.

Save & download your design
Once you’re happy with your design, click the “Download” button in the top right corner and select the file type you want to download your design as. You can download designs as PNG, JPG, GIF, MP4, or PDF files, or even directly share them on social media or via a link.
Productivity Tip: You can easily version your design for other dimensions by selecting the “Resize” option in the top left hand corner. Be sure to select “Copy & Resize” if you want to keep your original design specifications.

About Brand Kits in Canva
Not every design needs a brand kit, but for those that do, it’s a lifesaver. A brand kit is like a toolbox of brand-approved colors, fonts, logos and other design elements you can re-use across multiple designs. This way, you can easily create designs that are on-brand and consistent with your visual identity.
To create a brand kit in Canva, head over to the “Brand Kits” tab in your left-hand sidebar and click the “Create a brand kit” button. Add your brand colors, fonts, logos and more. Once your brand kit is saved, it will appear in the “Brand Kits” tab whenever you’re logged into your Canva account.
Design Tip: If designing from a template, be sure to create a Brand Kit to easily change all styling elements on the canvas in a single click.

So, what did we create?
The design below took me about 2 minutes to create, but don’t be discouraged if it takes you a bit longer. The first time is always the hardest! And remember, you can always save your progress and come back to finish your design later.
Now it’s your turn – go forth and Canva!